
Integration tests with Testcontainers and Docker
In this post, I will describe a Scala application integration testing process using Testcontainers.
The goal of this blog post is to give you ideas on how you can improve your integration testing process. Before we start we should align on terminology. When I say integration tests I mean tests that check the integrity of a component with the environment around it. The environment could be for example other system components or a database.
You can find all the code samples you will see below on GitHub.
The idea
In order to test the integrity of your application with the environment, you have to provide the environment. You either start real service instances on OS level or docker containers. The main task of Testcontainers is to do this work for you. It will manage dockerized container lifecycle. You have to select which containers you want to use and the framework will take care of the rest. That is why for the very first time you run a test it might take some time. Docker will download all the necessary images. For example, if you are using Apache Pulsar container in your test you will have to download the container (if you already don’t have it on your machine). Apache Pulsar version 2.2.0 image is about 1.8 GB, so it might take some time if you have dial-up Internet access. Container images are stored on your machine so whenever you will have to re-run the test again it will be much faster because the image will be already there.
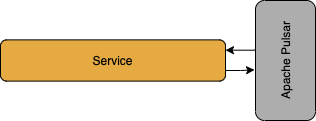
The service
Let’s imagine our system is built on top of Apache Pulsar.
A service posts data to a topic and then reads it. Simple as a hammer.
As Testcontainers is the main focus of the article we won’t pay attention to service design and implementation details too much. Let’s keep it super simple:
trait Service {
  def send(msg: String): Unit
  def receive: Either[Throwable, String]
}
We can send a message and receive a message. We expect that every message that we send can be received. Easy.
final class MyPulsarService(client: PulsarClient, topic: Topic) extends Service {
  // implementation details are not important
}
Service implementation needs a PulsarClient and Topic where we will post our message.
The rest is not important, but you can see full code on GitHub.
Requirements
In order to use Testcontainers we need a running Docker on our machine. If you don’t have it for some reason, this is your last chance.
Another thing we need - framework for unit testing. In examples below I will be using MUnit. It is a new super light framework which provides essentials for unit testing. Unfortunately, because it is a new framework, integration with some tools is missing. That shouldn’t be a show stopper for us. For convenience, I have implemented the integration and now it is available for everyone. Alternatively, we could just use Scalatest, but that’s boring, right? Let’s add necessary dependencies:
val mUnit = "org.scalameta" %% "munit" % "0.7.4" % Test)

val testContainers = List(
    "testcontainers-scala-munit",
    "testcontainers-scala-pulsar"
  ).map("com.dimafeng" %% _ % "0.37.0" % Test)
The very last dependency is Apache Pulsar module. It provides all the necessary to use Apache Pulsar container in the tests. There is a list of already implemented modules. If you can’t find a service you need in the list it is not a problem. I will explain this later.
The test
Let’s create our test scenario. We will send a message and check if we have received it. This is the only scenario we will cover. As the next step, we have to decide if we want to create the container for every scenario or once and for all. In our case, we would like to start the container once for all test scenarios (even if now we have only one scenario). We are ready to implement the test.
class PulsarIntegrationSpec extends FunSuite with TestContainerForAll {
  override val containerDef = PulsarContainer.Def()

  test("Send and receive a message") {
    withContainers { pulsarContainer =>
      val message = "hello"

      val client: PulsarClient = PulsarClient(pulsarContainer.pulsarBrokerUrl())
      val topic = Topic("non-persistent://sample/standalone/test/123")

      val service = new MyPulsarService(client, topic)

      service.send(message)

      assert(service.receive == Right(message))
    }
  }
}
Our test extends TestContainerForAll trait, which contains all the Docker related logic.
The only thing we have to do is to override containerDef which is container definition.
For that, we use PulsarContainer.Def() as it is the container we would like to use.
If we want to use a specific version of Apache Pulsar we can specify it in the constructor, for example, PulsarContainer.Def("2.2.0").
If you are planning to have several test suites with a specific container version I would recommend you to extract version to configuration or a singleton object.
When the time will come to change it, you will have to change it only in one place.
Next, define a test scenario with test method from MUnit as you would normally do.
Then wrap your scenario into withContainers block and we are done.
We have access to the container.
Now we can call exposed endpoints, read logs and do whatever we would like to do with the container.
In our case, we want to get Apache Pulsar broker URL. We need it for the client.
Then we send a message and expect that we have received it.
That is it.
After all test scenarios are finished, the framework will stop the container and clean up whatever is left (eg volumes).
Pure magic.
In MUnit integration starting and stopping a container is implemented using beforeAll and afterAll methods.
This has a drawback.
You can’t override beforeAll and afterAll methods without calling super.beforeAll() or super.aferAll() at the end.
If you will, your container won’t start or won’t stop.
![]() Correct:
Correct:
override def beforeAll(): Unit = {
  println("I'm doing everything correctly!")
  super.beforeAll()
}
![]() Wrong:
Wrong:
override def beforeAll(): Unit = {
  println("I forgot something important..")
}
Some readers could ask: Pavels, what should I do if I need 2 or more containers in a test? No worries my friends, I have a solution.
Multiple container test
Sometimes you want to run several containers in one test suite. Let’s extend our previous test suite and add MockServer container. At this point we shouldn’t care about specific container types, we won’t bother implementing a service for it. I’ve picked MockServer randomly for demonstration purposes and never used it myself.
class TwoContainersSpec extends FunSuite with TestContainersForAll {
  type Containers = PulsarContainer and MockServerContainer

  override def startContainers: Containers = {
    val pulsarContainer = PulsarContainer.Def(ContainerVersion.ApachePulsar).start()
    val mockServerContainer = MockServerContainer.Def(ContainerVersion.MockServer).start()

    pulsarContainer and mockServerContainer
  }

  test("Send and receive a message") {
    withContainers { case pulsarContainer and mockServerContainer =>
      // .. your test scenario code
    }
  }
}
First of all, instead of TestContainerForAll we extend TestContainersForAll trait. Note the plural form.
Latter behaves in the same way as former but adds several container support.
It will start and stop containers in beforeAll() and afterAll() blocks.
The difference is that we have to specify containers type in type alias Containers.
Using and combinator we compose two container types together. This combinator can be used to add as many containers as we need.
As our next step, we have to describe how containers should start.
This is required because sometimes we can have dependencies between containers or container start order is important.
Then we combine our containers together with and combinator and we are done.
Using withContainers we access both containers in the test body.
Starting container(s) in every scenario
In all previous examples, we were starting containers once for all test scenarios.
In some cases, we would need to have a fresh container for every test case.
For that we can use TestContainerForEach for one container and TestContainersForEach for several.
We can take every test above and just replace Testcontainers trait that we used. That is it. We don’t have to do anything else.
However, we should be careful here with beforeEach() and afterEach() methods.
Similarly to beforeAll() and afterAll() if we want to override them we have to call super method.
![]() Correct:
Correct:
override def beforeEach(): Unit = {
  println("I'm doing everything correctly!")
  super.beforeEach()
}
![]() Wrong:
Wrong:
override def afterEach(): Unit = {
  println("I forgot something important..")
}
Bonus track #1 - creating your own container
It is possible that you will want to use a container that is not in the list. You might even want to test a container that you have built yourself. Creating a custom container is easy. Let’s implement Nginx container definition ourselves.
class MyNginxContainer(tag: String, port: Int) extends GenericContainer(
  dockerImage = s"nginx:$tag",
  exposedPorts = Seq(port),
  waitStrategy = Some(Wait.forHttp("/"))
) {
  def rootUrl: URL = new URL(s"http://$containerIpAddress:${mappedPort(port)}/")
  def rootPage: String = Source.fromInputStream(rootUrl.openConnection().getInputStream).mkString
}

object MyNginxContainer {
  case class Def(
    tag: String = "latest",
    port: Int = 80
  ) extends GenericContainer.Def[MyNginxContainer](new MyNginxContainer(tag, port))
}
We create container definition Def, where we set variables that we might want to change in different test cases.
For example, we might want to test integration with older/newer versions of a service.
Later about that.
We extend GenericContainer where we pass our desired values.
There are many settings that we could override, you can explore them yourself.
We have implemented rootUrl and rootPage helper methods that we will utilize in a test for this container.
class MyNginxContainerSpec extends FunSuite with TestContainerForAll {
  override val containerDef: MyNginxContainer.Def = MyNginxContainer.Def(ContainerVersion.Nginx)

  test("Access to Nginx root") {
    withContainers { nginxContainer =>
      val expectedText = "If you see this page, the nginx web server is successfully installed"

      assert(nginxContainer.rootPage.contains(expectedText))
    }
  }
}
Here is a test that is using a custom container that we wrote above. Super simple.
Bonus track #2 - testing different versions of the same container
Imagine you have to test application integrity with two different versions of another service.
For example, we would like to test the integrity of MyPulsarService with Apache Pulsar versions 2.2.0 and 2.5.0.
Normally, to do that we have to:
- start Apache Pulsar of one version
- run the test
- turn off Apache Pulsar
- start another version of Apache Pulsar
- run the test again, turn off Apache Pulsar.
That is a lot of stuff to do. Let’s have a look at how this kind of scenario would look like using Testcontainers.
class DifferentVersionsSpec extends FunSuite with TestContainersForAll {
  type Containers = PulsarContainer and PulsarContainer

  override def startContainers() = {
    val pulsarContainer = PulsarContainer.Def("2.2.0").start()
    val pulsarContainerNew = PulsarContainer.Def("2.5.0").start()

    pulsarContainer and pulsarContainerNew
  }

  test("Send and receive a message") {
    withContainers { case pulsarContainer and pulsarContainerNew =>
      // skipping test implementation details
    }
  }
}
It is much more tedious to start these services manually than to set a value in the constructor. I have skipped test implementation details, but you can find them on GitHub. Here we just start 2 different containers of the same type and run our test scenario against both containers. If we would use two Nginx containers here, we would also need to set different HTTP ports for every container.
Bonus track #3 - using docker-compose
It is likely, that you already have implemented a docker-compose file in your project that starts all necessary services to test your application.
We can use that to simplify starting test scenarios.
Let’s write a simple docker-compose file, which will have Nginx container.
That should be enough to demonstrate the possibilities of the framework.
version: '3'
services:
  nginx:
    image: nginx:latest
    ports:
      - 80:80
Now let’s see how the test looks like.
class DockerComposeSpec extends FunSuite with TestContainerForAll {
  val dockerComposeFile: File = new File("src/test/resources/docker-compose.yml")
  val nginxPort = 80
  val nginxContainerName = "nginx_1"
  val exposedService: ExposedService = ExposedService(nginxContainerName, nginxPort, Wait.forHttp("/"))

  override val containerDef: DockerComposeContainer.Def =
    DockerComposeContainer.Def(dockerComposeFile, Seq(exposedService))

  test("successfully start Nginx with docker-compose") {
    withContainers { containers =>
      val nginxContainer = containers.getContainerByServiceName(nginxContainerName)
      // skipping the rest
    }
  }
}
Except for a few details, the test is similar to the suites we have seen before.
We have to use DockerComposeContainer, which accepts docker-compose as one parameter and list of exposed services as another.
Actually there are more than two parameters and you can explore them yourself.
In the scenario above we retrieve Nginx container by its name and we can do with it everything we did before and even more.
You can find the full suite here.
Summary
In this article we have explored Testcontainers. It is a modern way to efficiently write integration tests for your application. We can write complex test scenarios without thinking too much about container lifecycles. For example, we don’t have to start/stop containers manually. This saves our precious time we can spend watching cat videos on Youtube.
We saw how to write test scenarios for a different amount of containers. This might come handy if you want to create a complex test for your service and environment around it.
Having the possibility to customize containers can make testing efficient. You can pack your applications into containers and use them in test scenarios.
Also, we have seen that it is easy to write tests that can check backward compatibility of your services. We can use different versions of the same service for one test scenario.
We have simulated environment around application using docker-compose.
We wrote a test, that retrieves a specific container and runs checks against it.
Every test suite in this article was written using MUnit testing framework. However, Testcontainers also have integration with Scalatest and Selenium. I encourage you to try it yourself or at least to take a look at examples that I have prepared for you, dear reader.
Cheers!